Teaching Art is a feast into a of colour, line, texture, space and shape. By encouraging a visual exploration in my learning I love developing a creative approach to learning in the classroom. By encouraging different techniques and an understanding of art I hope to help students appreciate visual learning more. I hope you enjoy my uploads and can use them. Please contact me if you require any further information.
Teaching Art is a feast into a of colour, line, texture, space and shape. By encouraging a visual exploration in my learning I love developing a creative approach to learning in the classroom. By encouraging different techniques and an understanding of art I hope to help students appreciate visual learning more. I hope you enjoy my uploads and can use them. Please contact me if you require any further information.
The objectives
To find out about what you have learnt at primary school in Art To understand what the elements of art are: line, shape, colour, texture, space, pattern and tone are and to make a creative display page of these words in your books on an A4 page
There are questions to assess what was achieved in Primary school
There is also a short general knowledge task
Basic Visual Information on Elements of art
Finally a presentation on the Elements of art
Success Criteria
1.Create an interesting display on an A4 or A3 page
2.Creatively arrange the elements
3.Write out the names of the elements clearly and display the word visually
4.Choose a variety of colours and different marks to display the element
Visually show patterns for the elements or draw a picture you like to show for the element of art
This is a lesson for year 7 who are learning to shade and to create a 3D form. This is the start of a Scheme of work (Powerpoint one) where students draw a pebble and then eventually make a tile in the shape of their pebble and design a relief surface based on Hundertwasser.
There are three powerpoints on Tes in a bundle linked to this unit of work or you can use it as a drawing exercise to learn to shade 3D forms.
This is a short example showing different steps to get a 3D sphere form and using tonal values to develop this form. There are exercises on markmaking and how to create a tonal value. There are the main breakdown of what is needed in a sphere in tones: Light, light grey, middle grey, dark grey and black with reflected light. There are examples of showing how to shade in the direction of the form.
Learning Objective was:
To create a presentation on an A3 sheet of your observation drawing studies showing volume drawing of pebble
To learn to draw 3D geometric shapes and firstly practise mark making and a range of tones in media: charcoal.
To develop observational drawing techniques.
This follows with Powerpoint Two and Three where students then begin to :
Present preparatory work on a page and to plan a design for clay tile.
Develop painting style like Hundertwasser (study the style of this artist) and use watercolours and understand what is a style in Art.
To complete a clay tile and paint design on tile.
These are a set of 6 sheets which can be laminated for classroom tables to help students with writing about Art.
These are lists of descriptive words linked to the Elements of art and the Principles of design. These will help students to be able to write about artworks and help to broaden vocabulary.
There are also words to help with writing at GCSE and support with writing under the GCSE Assessment Objectives as well.
There are also sheets to help with writing frames to support weaker students when they analyse and write about their artworks.
This can be used with Key Stage 3, GCSE and A-level
Leaving these on the desks in the classroom support literacy learning and help students with vocabulary.
Students are to develop creative drawing by analyzing and interpreting a variety of selected artists.
Students will produce a drawing showing contextual evidence that supports the assessment criteria for the A Level course.
This powerpoint gives the LESSON PLAN AT TH END OF THE PRESENTATION.
Students to reflect on examples of copies of drawings of different MASTERS and illustrators and begin to analyse the types of shapes, lines and marks.
Develop an understanding of signature styles of particular artists and the way the artist’s signature captures the intrinsic meaning of the artist.
Students to develop an A2 sheet of drawings which shows the different mark making skills of a number of different artists; develop a still-life drawing which support a number of different artists marks.
You must show evidence of research and of investigating and developing ideas. This should include visual work and, if appropriate, annotations or written work. Practical responses to the work of other artists, designers, craftspeople and photographers must show development in a personal way.
ASSESSMENT OBJECTIVE:
develop ideas through sustained and focused investigations informed by contextual and other sources, demonstrating analytical and critical understanding
Analysis Activity- follow Mark-making analysis of artists
Put students into PAIRS give out an example of each of these artists drawing – photocopy to pair
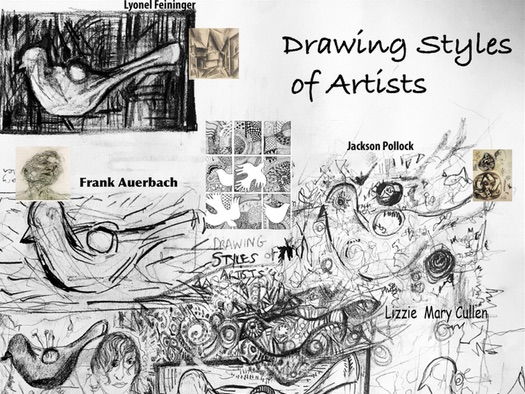
CULLEN AND AUERBACH,
VAN GOGH AND POLLOCK
FEININGER AND GILMAN
NICOLSON AND MICHELANGELO
Students to describe the marks, the quality of the lines and shapes that define the artist.
Analysis Activity Feedback– Choose one of the works and will one of you in the group discuss this with the class. Other students may also add comments.
TASK ACTIVITY Creative Practical Skills independently
Students to choose 2 of the artists discussed or analysed in the groups and try to do a drawing now in the style of those two artists.
With a ‘window frame’ students to draw in the style of the artist in a small frame on their sheet.
Prompts Questions to Evaluate Drawing outcome
What does it remind you of?
What does the work represent?
Have any parts been exaggerated or distorted?
What message does the work communicate?
What kind of marks does the artist use?
What kind of shapes can you find?
What materials and tools have been used?
How does the work make you feel? Does the line, shape, colour affect your mood?
What do you like about it Why? What don’t you like? Why?
How might you take ideas to use in your own work?
What do you know about the artist?
Does the work relate to the social or political history of the time?
Students make a fold out booklet of each of the principles.
Video clip on how to make a booklet and then to make each fold on each principle. This powerpoint gives a slide for each principle and students need to make each side of the booklet as creative as they can. One side is the explanation of each principle and the other side one’s own interpretation.
The powerpoint has examples of artwork of each principle to help students to develop their own ideas.
Sheets are copied and students follow making a booklet where one side of the booklet is to give information and definitions on the principles and the other side of the booklet is the student’s own interpretation of the principle.
There are prompts given on each slide explaining what is required for students to write on each principle and examples of what is expected for the student to gather some notes on each principle.
This is lesson 4 in the portrait project.
Students firstly do a pencil shading of their face using the grid technique and learn how to draw different parts of the face carefully.
Secondly students do a monoprint and this is in lesson 2 portrait project and they use their photograph to trace off into the ink to make the monopring.
Thirdly students then collage into the monoprint and use Paolozzi as an artist and collage into the monoprint.
In this powerpoint the student use one of their photographs and draw into the photocopy. Students look at the artist Chila Burman and look at the way she interprets her Asian and British identity. Students need to think about their own identity and the way they are going to collage into their own photo-copy.
Students use felt tips and draw into the photocopies making patterns and try to interpret cultural patterns in bright colours.
Your Learning Objective was:
To study an example of CHILA BURMAN n your book and describe what you see
Students to find out about CHILA BURMAN and begin to understand her Asian and British identity.
Students to use their photograph and develop the bright colours and cultural identity in the portrait.
To use cultural patterns and to create a self identity photo portrait.
SUCCESS CRITERIA
Cultural awareness of our differences
Understanding of different styles and using digital photography creatively with patterns
Appreciation of own patterns and self-identity
Collaging: Photographs of everyday items, patterns, favourite clothes, magazine text, Newspaper highlights, paint textures and close up of photos of household items: objects that show own culture and self-identity
This is a key stage 3 project where students do a polyprint on fabric using printing inks. This is a short 6 week project but could be developed to incorporate embellishments and sewing skills to fabric. I did this with year 8 and it took 6 weeks. Student enjoyed the outcome and it could have been made into a cushion for each student but we made a class fabric wall hanging. (There is a second Powerpoint in a Bundle which has all the pictures used for students to work from - A-Z of nature pictures)
Artists used: Angie Mitchell and Ernst Haeckel
Resources required
Polyprint blocks
Printing ink
Rollers
Tables to roll out on
Fabric square per child
Paper for test prints
Research sheet for drawings and artist research.
Project schedule 6 weeks
The resources for the students to work from. Each student chooses what they would like to draw.
The steps to take while making the print and examples of student’s outcome.
Students begin by researching Angie Mitchell and Ernst Haeckel and make up a sheet with these two artists and their drawings. The drawings they do of one of the pictures of the slide pictures of animals and bits of nature from A-Z. Students choose which animal or fish or plant they would like to draw. Students spend time doing a detailed drawing and design a border pattern for this work in black and white.
Success criteria of drawings
To use fine lines and to capture quality detail
To concentrate on negative and positive shapes
To develop a border pattern from nature around the drawing
To try to layer up your drawing with foreground and background shapes
The students drawings are then photo-copied and transferred to the polyprint block. Students use the photocopy to press through onto polyboard. The students are given a square and a strip of polyprintboard . Students first of all experiment printing on paper with their design and border. Students can do a black and white print or do a polyprint print of two colours overlaying their inks.
The slide presentation gives you also opportunities for reflection and evaluation of outcome at the end.
I have presented my artists in my book
I have compared the works of 2 nature artists
I have written a short paragraph on the style of artists
I have a careful line drawing of my subject
I have created my own artwork based on my research of subject colour
I have a plan for my print design and have written about relief printing
I have tested working with polyprints
Student outcome is a wall-hanging and we sewed all the students outcomes together to make a fabric collage of squares.
Students to be given a strip of paper and fold this into 8 sections. On the end two folds students make a front cover.
There is a You tube video link to this project.
In the six sections in the middle of the fold out paper there are 6 tasks for each of the elements of art.
Line, Shape, Colour, Texture, Space and Value.
Students on the one side of the fold out write information about the element and on the other side students are to do a drawing of the element as a creative response to each element
This is a fun project and the outcomes are successful.
Students are developing an understanding of tonal values and 3D forms and looking at markmaking, and a range of tones and depth of tones.
• Students reflect on what is a shape, and how to turn this into a 3D form and look at ways to do this with some key vocabulary terms.
• Develop an understanding of how to use charcoal and chalk.
• Students on a planning sheet will need to develop their mark making skills to enable them to shade using tones and students will look at various ways to use line techniques to create tone: stippling, hatching, cross hatching, scumbling, contour hatching.
• Students then will look at the lighting of a 3 D form and how the shadow is thrown.
• Students will practice a tonal range on a geometric shape.
Students will then work in a group and each student to draw a geometric shape which can be put together into the fantasy figure composition based on the Surrealism Picasso figures. Examples given of the geometric standing figures of Picasso, De Chirico and Desmond Morris.
Students follow the powerpoint using chalk and charcoal and explore mark making techniques to start.
Then students look at the tonal contrasts and begin to develop a geometric shape.
Each child to do a different geometric shape and in so doing build a figure of the shapes.
Reflection and Evaluation
Activate Prior Knowledge:
Students to complete the questions on slide 2 on a large A2 sheet on what they know about a shape/form/3d. Questions on powerpoint/sheet per child.
Ask students to come to the board to write down the answers.
Ask students about charcoal and get them to explore mark-making on large sheet. Understand how to use charcoal and chalk.
Playfully begin to develop their use of line (mark-making) and tone (contrasts and lighting) by using the chalks and charcoal.
To follow teacher demonstration on the large A1 sugar paper.
Draw out the surrealism fantasy stick figure composition made up of geometric shapes and then each child will begin to start shading their form.
Final Evaluation:
What is creative about the work on Show? How can we improve any of the work on Show?
Who has excelled in their work today? And Why?
If we had to evaluate the outcome – what work shows creativity, imagination and, an attempt to truly achieve success in outcome today?.
Dismiss class
This is a short project for students to take a photograph of a doodle they do and where they combine it with an object.
Students look at the artist Vincent Bal and there are video links to his Shadowology work.
Students are then asked to make up their own version of this by taking an object in their house and then turning this into a picture by combining this object with a doodle.
There are some short questions to answer on the work of Vincent Bal.
Success Criteria-
Develop a range of textural paint techniques
Experiment with blending colours
Experiment by layering and combining different techniques
Create a water colour exploration page to show variety of techniques.
Make a page of experiments following the list below.
Try to explore each technique.
When complete cut these into square shapes and display this neatly in your sketchbook.
Heading: Watercolour experiments
A Graded wash warm colour to cold colour
B. SGRAFITTO-scratch paper wash over with watercolour
C. DRIPPING TECHNIQUE
D. WET IN WET- drop another colour of waterscolour into a wet wash
E. GRADED WASH light to dark
F. CLING FILM-put over wet wash and let dry
G TRANSPARENT washes of colour overlapping each other
H. OPAQUE to transparent
I. USING BLOCK OUT TO CREATE WHITE shapes
J. FLAT WASH
K LAYERING OF PAINT details
L. SPLATTER TECHNIQUE
M. Wet paint and drop salt
N. Use a dry brus over colour
O. Use masking tape to block out areas
P Stippling with watercolour
The powerpoint gives an example for each technique
There is also an exercise to match the correct picture with technique and an answer page.
There are plenty of examples of Andy Goldsworthy on the slides and examples of other peoples work doing land art.
Students will also need to identify various examples of materials used in Goldsworthy’s work.
Students will also need to complete an analysis of one example of one of Goldsworthy’s work: Penpont in Cairn. There are questions to answer on this work.
Also there is a project task for students to make their own land art outcome and examples to be inspired from.
Students will create their own open window painting after been inspired by Henri Matisse
Students to write about Henri Matisse 'The open window ’ and understand what is Fauvism
Easy student examples - outcomes of watercolour designs
Clear step by step drawing of the windowdesigns and students left to add in own detail to make it more interesting
Students gain confidence in drawing using the simplified shapes of Fauvism and practise watercolour techniques
This is part of the self-identity project. Students firstly do a mindmap questioning and finding out about their own personal identity.
Students then do a monoprint and then use cultural images to collage into their monoprint portrait.
Then after this there is an extension to this project where students use Chila Burman and draw out a large body and in a group collage into this using tattoo patterns and symbols.
The Learning Objectives for this task is:
To develop into monoprinting cultural symbols and patterns.
Brief study of Chila Burman and looking at her collage work.
Cultural awareness of our differences and create interesting patterns and textures and symbols of our culture.
Understanding of different styles
Looking at a brief understaning of Tattoo art.
Appreciation of own patterns and self-identity
Collaging: Photographs of everyday items, patterns, favourite clothes, pictures of household items, objects that show own culture and self-identity
This is a slide presentation which explain how to make a fold out sketchbook and then gives tasks in each of the folds to do to make a creative sketchbook.
Students will need to follow the slides and be selective what they would like to do in each of their 16 blocks of their A2 paper.
The slide presentation has a lesson plan, a set of notes which need to be copied for the lesson and some collage sheets which need to be copied for students.
It is a good year 9 project and can link to Self-identity project or used for GCSE to make a small drawing sketchbook to pull out in their sketchbook.
Students enjoy making this interesting special fold out little booklet.
Lesson Objective:
1.Discover what it is to be creative and how to apply this by following the prompts on the slides.
2. Make a fold out sketchbook - by following the instructions.
3. Use ideas, thoughts, pictures and prompts to be creative, examples given on the slides.
4.Use collage and drawing techniques- examples shown in slides.
5. Learn about Keri Smith as a contemporary illustrator and Guerrilla artist and her ideas to prompt creativity
Some CREATIVE ACTIVITIES - Good homework project tasks as well to set.
Make a SMALL ART JOURNAL based on KERI SMITH’s "Wreck my Journal’
YOU COULD TRY complete A RECTANGLE OF YOUR A2 SHEET EACH DAY
These are some of the tasks…
Draw something interesting
Draw what makes me feel ‘calm’
Draw what is a ‘happy place’ and write words that make you happy
Draw the people I meet on a day
Frame collage and draw in the space a drawing
Do Zentangles (DOODLES)
Make visual thoughts – a ‘thought garden’ - draw in the collage of grass
Paste the ‘Blue frame’ and draw a beautiful scene in the frame
Draw on a shopping label, date and paste this.
Paste the television picture and then draw a picture in the TV.
Draw over the wall-paper (graffiti)
Paste the picture of the window frame and draw in the window
Draw to the sound of music and something that is loud.
Draw the family and friends I meet
Draw my hand and write down in the hand everything I touch for the day
Draw a pencil on a crushed piece of paper (Crush it) and paste this in
Transform the stone texture picture and turn it into something else.
…see other activities
HAVE FUN! AND ENJOY BEING CREATIVE
Lesson Outcome
Create a drawing booklet to take home for the summer
Show the ability to use ideas, pictures, thoughts to generate a drawing
Show an ability to collage and to combine this with drawings.
Presentation of drawing ideas in the booklet
Understanding of layering and juxtaposing concepts to generate ideas
Exercising and opening the mind to new ideas like Keri Smith.
Lesson Resources
A2 white cartridge paper
Pencil
Eraser and sharpeners
Pritt stick
Scissors
Evaluation: - see fin
Discuss students have achieved? Review creativity?
An visual reference to architectural features with reference to Classical Greek and Roman architectural features in Artworks, various building ornaments and different buildings.
There are lots of artists who have use classical architecture in their own art. Also lots of examples of artists and reference to examples of John Piper and his paintings on classical architecture and students could develop their watercolour techniques copying this artist. But there are a number of different artists to use to inspire students to develop their own technique.
Also, developing the style of John Piper in different techniques: for eg. wax painting, water-colour techniques.
**The resource includes: **
Examples of architectural artists
Examples of a student work collages of architecture Examples of student work of combining buildings into a collage
Resource sheets of architectural photographs of churches to use for studies
Resource sheets of different buildings ornamentations to use in collage
.
**Learning Objectives **
To develop a Classical Greek and Roman element in one’s work of art at KS3, KS 4 - GCSE Art and A-level Art
To study various examples of how artists have used these classical architectural elements in their works of Art
A look at various contemporary artists and how they have used the Classical elements and architectural features
To develop a collage combining photographs, painting and pen work.
Choose one of the artists and copy their style and collect examples of their work to use in your collage.
Take photographs of buildings in your local environment and use this in your collage.
We will be learning about Ben Heine and how he uses Drawings and Photography
Complete the questions attached:
Heading: Ben Heine
Create your own version of Ben Hearn.
IDEA 1
DOING A DRAWING IN A PHOTOGRAPH
Steps for success
Take a photograph and load this up on a Powerpoint.
Do a drawing to add to this photograph. Load this up on the powerpoint over the photograph. Remove backgrounds. Look at the examples of Pencil and Camera on slide 2 and 3.
You could try make it quirky, personal or relate to your situation.
It must not be an exact copy of the photograph but be combined in an original quirky way.
You may add in interesting ideas that change the photograph
IDEA 2
TAKING A PHOTO GRAPH AND ADDING IN CIRCLES
KEYS FOR SUCCESS
Take a photograph and DRAW over the photograph all the circles like the examples of Digital Circlism
Try to use your own photograph
Make it as unique as you can.
You could try make it quirky, personal and could relate to your situation.
A mandala drawing - showing basic steps - to build a patterned line drawing.
In this task the students are asked to draw 4 rings using any object they have at home to make the circular rings.
Students are then given clear instructions on how to break up the circle and are given examples of patterns to follow.
There is also a very good video clip which gives clear guidelines.
At the end of the making of the Mandala students are asked to do research into the Mandala and to find out what makes up a mandala. There are questions for students to answer.
Attached are three powerpoints for developing a KS3 Collage in Fabric on the 12 Days of Xmas and the artist Aminah Robinson.
Students use the ‘resources’ powerpoint to draw ideas to make up their own design for the 12 days of Xmas.
Class divided and each child gets a different day to design.
I used Black velvet fabric as my backing fabric and each time the student did their drawing I traced this onto different coloured fabric shapes and students then cut this out and pritt sticked this onto the black velvet fabric.
see powerpoint of song '12 days of xmas ’ for resources
see powerpoint Artist interpretation and learning about different fabric artists.
see powerpoint on stitchung techniques
Thirdly, students then cut their designs out in fabric - I used transfer receipt like paper so students could trace onto the fabric and then cut out.
Finally students then embellish their fabric with different stitches and I have a powerpoint with video links on how to do the different stitches: running stitch, blanket stitch, satin stitch, chain stitch and daisy stitch…